Best Guide Scope and Camera
The best first guiding package is the SVBONY SV905C guide camera at $119.99 paired with the SVBONY SV165 30mm f/4 guide scope at $50.21, about $170 together, which closes a feedback loop around the mount to correct tracking drift and periodic error, though it cannot correct field rotation caused by poor polar alignment.
A mount that is not guided is running blind. It turns at the rate it was told to turn and has no way of noticing that it has slipped, drifted or briefly sped up, so every one of those errors ends up written into the exposure as an elongated star. Guiding closes that loop with a second small telescope and a small camera watching a single star. The pairing that suits most first imaging rigs is the SVBONY SV905C guide camera with the SVBONY SV165 guide scope, roughly $170.20 together, which is the cheapest change in this hobby that visibly improves star shapes.
What does autoguiding actually correct?
Two things, and it is worth naming them precisely because they are the only two. Tracking drift is the slow, one-directional wander of the target across the frame, produced by a polar axis that is slightly off the celestial pole and by atmospheric refraction shifting the apparent position of anything near the horizon. Periodic error is the repeating cycle of speeding up and slowing down that comes from tiny manufacturing imperfections in the worm gear driving the right ascension axis, which repeats once per worm revolution and shows up as stars sliding gently back and forth across a long sub. Guiding software watches a chosen star, measures where its centre has moved to, and issues small correction commands to the mount several times a minute, cancelling both errors before they accumulate into anything visible.
What guiding cannot correct is field rotation. When the mount's polar axis is not properly aligned with the celestial pole, the whole field slowly turns about the point the guider is locked onto. The guide star itself sits perfectly still, so the guiding graph looks excellent all night, while stars toward the corners of the frame trace out progressively longer arcs. That is not a guiding failure and no amount of tuning the guiding settings will touch it. It is fixed on the tripod, with a better polar alignment, which our guide to setting up an equatorial mount walks through step by step. A perfect guiding graph with smeared corners is the classic signature of this exact mistake.
When does guiding actually become necessary?
The trigger is focal length, not exposure length alone, because a fixed angular error covers a fixed angular distance regardless of your telescope while the number of pixels that distance lands on grows directly with focal length. Take 5 arcseconds of uncorrected drift across one sub-exposure, a modest amount for a well polar aligned mount, and a camera with a typical 3.75 micron pixel pitch. The table below shows how much of the frame that same error smears across as focal length climbs.
| Imaging focal length | Image scale | Star smear from 5 arcsec of drift | Practical unguided sub | Guiding verdict |
|---|---|---|---|---|
| 200mm | 3.87"/px | 1.3 px | 3 to 4 min | Optional |
| 400mm | 1.93"/px | 2.6 px | 2 to 3 min | Useful |
| 600mm | 1.29"/px | 3.9 px | 60 to 90 s | Strongly recommended |
| 1,000mm | 0.77"/px | 6.5 px | 30 to 60 s | Necessary |
| 2,000mm | 0.39"/px | 12.8 px | 20 to 30 s | Necessary |
Image scale assumes a 3.75 micron pixel pitch. Unguided sub lengths assume a careful polar alignment and a mount loaded well inside its imaging payload; a mount running near its limit will fall short of these at every focal length. See exposure time by focal length for the wider reference table.
The practical reading is that around 500mm to 600mm is where guiding stops being a refinement and becomes the thing standing between you and usable data. Below roughly 400mm, a good polar alignment on a well balanced mount will often carry a two to three minute sub on its own, which is why wide field imagers can put the purchase off for a season. Above 1,000mm, unguided subs get so short that read noise starts eating the advantage of stacking them, and the guiding package pays for itself on the first target.
Does the guide scope focal length have to match the imaging scope?
It should be broadly in the same ballpark, and it can be a great deal shorter than the imaging telescope. An older rule of thumb insisted the guide scope be within a third or so of the imaging focal length, which came from an era when guiding software measured a star position to the nearest whole pixel. Modern software does not work that way: it fits a curve to the star's brightness profile and resolves the centre to roughly a tenth of a pixel.
Worked through, that is why a tiny guider does the job. The SVBONY SV165 is a 30mm f/4 optic, so its focal length is 120mm. With a 3.75 micron guide camera pixel that gives an image scale of about 6.45 arcseconds per pixel, which sounds hopelessly coarse until you divide by the roughly one tenth of a pixel the centroiding routine actually resolves, giving about 0.65 arcseconds of positional sensitivity. Compare that with the imaging camera at 600mm, which records about 1.29 arcseconds per pixel: the guider sees a smaller error than the imaging camera can record, even at a 5x spread in focal length. That is the whole argument for a short, light, cheap guide scope over a heavy long one, and the weight saved counts directly against your mount's imaging payload, which our mount payload calculator will hold you to.
Which guiding setup should you actually buy, by budget?
Guiding is bought as a pairing rather than as a single item, so read the first two entries below as one purchase. The tiers above them change what the pairing is made of rather than adding capability the cheap version lacks.
Guide scopes and guide cameras by budget
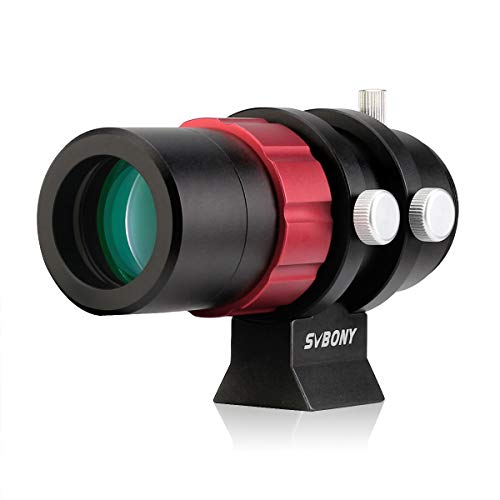
SVBONY SV165 30mm f/4 Guide Scope
A 30mm f/4 optic with a 120mm focal length and a helical focuser, sized to sit in a finder shoe on top of the imaging tube. Short focal length is not the handicap it once was, because guiding software resolves a star centre to a fraction of a pixel.
Best for: Guiding a small refractor from a finder shoe
Check price
SVBONY SV905C Guide Camera
A small sensor in a 1.25 inch barrel that slides into the guide scope and streams frames to whatever guiding software you run. This is the cheapest part of an imaging rig that changes the results, and it is the piece that turns an open loop mount into a closed loop one.
Best for: A first guide camera on any mount with an autoguider port
Check price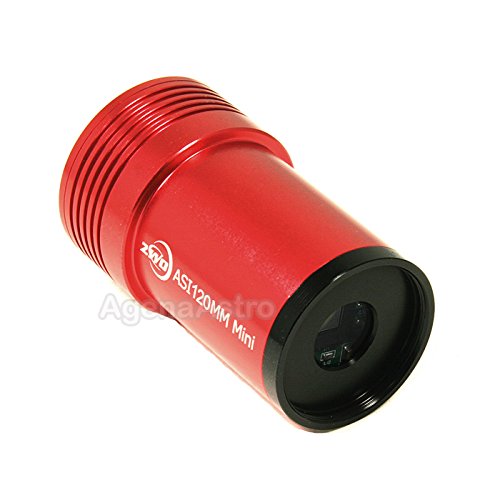
ZWO ASI120MM Mini Monochrome Guide Camera
The monochrome guide camera most imaging software was written around, with 3.75 micron pixels and no Bayer filter, so every pixel records the full brightness of the guide star rather than a filtered third of it. Finding a usable guide star gets easier in a sparse field.
Best for: Guiding at longer focal lengths where guide stars get scarce
Check price
ZWO ASI585MC AIR Cooled Camera with ASIAir Bundle
A cooled camera with a guide camera built in, bundled with the controller that runs the whole rig from a tablet. Buying the ecosystem in one purchase removes the cable and driver problems that stop most first imaging nights dead.
Best for: A complete imaging rig bought in one decision
Check price
ZWO ASI585MM AIR Cooled Monochrome Camera with ASIAir Bundle
The monochrome version of the all-in-one bundle, with the guide camera and the controller already inside the housing. Buying the ecosystem in one purchase removes the cable and driver problems that end most first imaging nights before any data is captured.
Best for: Going mono without assembling a rig from separate parts
Check pricePrices change often, confirm on Amazon. As an Amazon Associate we earn from qualifying purchases.
The SVBONY SV165 and the SVBONY SV905C together are the standard first guiding package, at roughly $170.20 for the pair, and they mount in a finder shoe on top of the imaging tube with no modification to anything else. The ZWO ASI120MM Mini is the monochrome alternative that most imaging software was originally written around, and its lack of a Bayer filter makes faint guide stars easier to lock onto. At the top of the page, the ZWO ASI585MC AIR at $999 and the ZWO ASI585MM AIR at $1,299 take a different approach entirely: the guide camera and the rig controller live inside the main camera housing, so there is no separate guider to cable up, power or align at all.
Should a guide camera be monochrome or colour?
Monochrome is the better tool for the job. A colour sensor carries a Bayer filter array placing a red, green or blue filter over every pixel, so each pixel records roughly a third of the light arriving at it. A monochrome sensor has no such array and counts every photon that lands, which means a fainter star still registers strongly enough to guide on. In a sparse field at long focal length, where the guider is looking at a small patch of sky and there may be only one or two candidates in the frame, that sensitivity difference decides whether the session happens at all. Guide frames are thrown away and never appear in the final picture, so the colour information a colour guider records is pure waste.
That said, the colour SV905C guides perfectly well at the short and medium focal lengths most first rigs use, and it costs less. Buy the colour one and get guiding this season rather than deferring the purchase for a specification difference that will not stop you at 400mm.
Who should not buy the expert tier?
Anyone who already owns a working camera should not buy the ASI585MC AIR or ASI585MM AIR for the guide camera inside them. These are main imaging cameras with a guider and a rig controller integrated, and the integration is the product. Bought as a guiding solution they cost several times a guide scope and guide camera pairing, and they replace an imaging camera you may be perfectly happy with. They also commit you to one manufacturer's ecosystem for the mount control, the focuser and the capture software, which is a real constraint if you already run a laptop-based workflow you know. Buy at that tier when you are building a rig from nothing and are deliberately paying for the cabling and driver problems to be solved in one purchase, which is a genuinely good reason. Do not buy at that tier because a guide camera is the thing missing from an otherwise finished setup.
Guide scope or off-axis guider?
A guide scope is a separate optic riding alongside the imaging telescope. An off-axis guider is a prism inside the imaging light path that picks off a small piece of the same beam before it reaches the sensor. The advantage of the off-axis approach is that it is immune to differential flexure, the slow relative sag between two separately mounted tubes as the rig tracks across the sky, which produces trailed images while the guiding graph insists everything is fine. The disadvantage is that it is harder to set up, offers a much smaller patch of sky to find a guide star in, and needs precise spacing to reach focus at the same point as the imaging camera.
For a small refractor under about 800mm, a guide scope in a solid finder shoe is the right answer and flexure rarely appears. At long focal length on a heavy Schmidt Cassegrain, where mirror flop adds its own movement that a separately mounted guider cannot see, the off-axis guider stops being the awkward option and becomes the correct one.
What goes wrong with guiding, and how do you avoid it?
Three failures account for most bad nights. The first is calibrating the guider on a star near the celestial pole, where the mount's corrections produce very little apparent movement and the software cannot work out how far a given command actually moves the sky; calibrate nearer the celestial equator instead. The second is overcorrection, where aggressive settings chase every flicker of atmospheric seeing and the mount ends up fighting the air rather than the gear train, producing worse stars than no guiding at all. The third is loose hardware: a guide scope in a plastic shoe, a finger-tight thumbscrew or a sagging cable loop introduces movement that the guider faithfully corrects for on the guide star while the imaging camera records the opposite.
Beyond that, plan the cabling before the first session rather than during it. A guide camera, a main camera, a mount control cable and a dew heater add up quickly, and a powered USB hub on the mount saves a great deal of tugging at connectors in the dark. A mount with a real autoguider port such as the Sky-Watcher Star Adventurer GTi is the minimum requirement for any of this, since a mount that cannot accept correction commands cannot be guided at all no matter what optics you point at it. Our best astrophotography mount guide covers which mounts qualify, and the expert astrophotography setup shows a full guided rig assembled end to end.
Related reading
- Best astrophotography mount, the thing guiding is correcting
- Best astrophotography camera, what sits at the imaging end
- How to set up an equatorial mount, the polar alignment guiding cannot replace
- Exposure time by focal length, unguided limits as a reference chart
- Mount payload calculator, count the guider against your payload
- How to start astrophotography, the full beginner workflow
We review it on its own too, in full detail: the ZWO ASIAIR Plus, which handles the guiding.
Frequently asked questions
What is the best guide camera for a first imaging rig?
The SVBONY SV905C at $119.99, paired with the SVBONY SV165 30mm guide scope at $50.21 for a complete guiding package around $170. That pair bolts into a finder shoe on top of the imaging telescope and turns an open loop mount into a closed loop one, which is the cheapest change in astrophotography that visibly improves star shapes.
What does autoguiding actually correct?
Tracking drift and periodic error. Drift is the slow wander caused by imperfect polar alignment and atmospheric refraction. Periodic error is the repeating speed-up and slow-down of the worm gear driving the mount, cycling once per worm revolution. Guiding watches a star and issues small correction commands several times a minute, cancelling both before they become visible star trails in a long exposure.
Does guiding fix a bad polar alignment?
No, and this is the single most common misunderstanding about it. Guiding cancels drift, but it cannot cancel field rotation, which is what a badly aligned polar axis produces. The frame slowly turns around whichever star the guider is locked onto, so that star stays pinpoint and the guiding graph looks perfect while corner stars draw arcs. Field rotation is fixed at the tripod.
Does the guide scope focal length need to match the imaging scope?
It should be broadly in the same ballpark, and it can be a great deal shorter. A 120mm guide scope routinely guides a 600mm imaging telescope, roughly a five to one ratio, because modern guiding software measures a star centre to about a tenth of a pixel rather than to the nearest whole pixel. That subpixel measurement resolves errors finer than the imaging camera can record.
At what focal length does guiding become necessary?
Around 500mm to 600mm for most people. The same angular tracking error covers more pixels as focal length climbs, so five arcseconds of drift that smears a star across roughly one pixel at 200mm smears it across nearly four pixels at 600mm and around thirteen at 2,000mm. Below about 400mm a good polar alignment often carries a two minute sub unguided.
Should a guide camera be monochrome or colour?
Monochrome is the better tool, because there is no Bayer filter discarding light, so a faint star registers more strongly and usable guide stars are easier to find in a sparse field. A colour guide camera such as the SV905C works perfectly well at short and medium focal lengths and costs less. Guide frames are never part of the final picture, so colour information in them is wasted anyway.
How we choose: we compare published manufacturer specifications, optical figures we can verify, and reviews from owners who have used the equipment under real skies. We do not test gear in person. Never point any telescope, finder or binocular at the Sun without a certified full-aperture solar filter fitted over the front of the instrument.
Recording your own eyepieces, exit pupils and sessions? The Observing & Astrophotography Planner is the paid version of these pages: 8 printable worksheets you fill in with your own numbers, plus the full PDF, $29.